DIY Custom Made Storage for Sewing Machine Presser Feet

Featured

Need an idea on how to reorganize your collection of sewing machine presser feet?

This post is in response to LaDonna’s request for more information on how I made my custom storage for sewing machine presser feet that was mentioned in my post on sewing room organization.

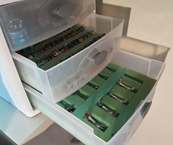
The original accessory box containing that came with my sewing machine had no space for additional specialty feet. During one of my sewing room reorganizations, I decided to create a better, and bigger storage space for sewing machine accessories using a small plastic three drawer case.

One drawer would be for thread bobbins and one for presser feet. For each drawers, I cut 1” thick foam to fit in the bottom of each and spaces cut to fit bobbins and feet.

It has been several years since I made the foam organizers for bobbins and feet, so I had to go back and take a good look at them to remember how they were made.

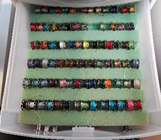
For the bobbins, it was easy to cut channels in the piece of foam to hold the bobbins. All I had to do was cut parallel straight lines in the foam at about ½” depth with a craft knife, then fold the foam so that the piece that needed to be cut out for the channel popped up and I could easily use a pair of scissors to cut the strip out.

Okay, I know this post is about making a foam drawer insert for presser feet, but it is the same idea, just a little more attention to detail. Just wait and see.

For the presser feet, I tried cutting out individual rectangular indentations in a single piece of foam, but that was frustrating with messy results that was not worth completing. I had to rethink the process, and go back to what I already knew worked- the channels for the bobbins.

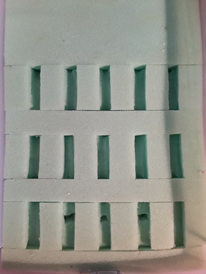
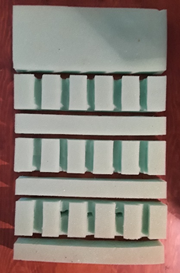
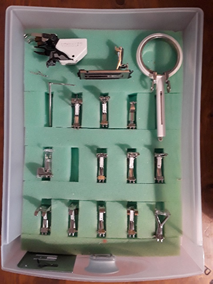
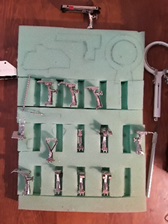
The new design for the presser feet drawer insert is really one piece cut into several pieces. Pieces that are cut in channels like the one for bobbins alternating with blank spacers between them. In the picture on the left, you can see the whole insert with the pieces pushed together and in the picture on the right you can see what it looks like when pulled apart to show the separate pieces. fortunately, I never glued the pieces together, making it easy to take apart.

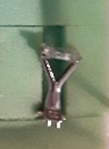
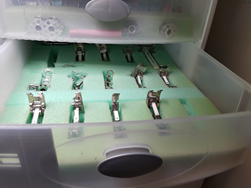
When I went back to see how I had made the insert for the presser feet, that is when I realized it needed a little improving to finish making the spaces a better fit for some pieces and create spaces for several others. As you can see, the closeup of the foot on the right of the first row at the drawer front shows how it just does not fit in the generic rectangular space. Later, when rearranging the feet, it gets assigned a new permanent space, adjusted to fit it.

I decided that showing how I altered the existing spaces would help explain how the spaces were originally made.

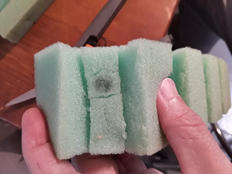
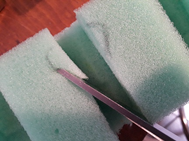
The following two pictures show how an indentation was added to a channel to accommodate the thumbscrew that sticks out the back of many of the feet. This little cutout in the channel allows the foot to rest in the space better.

For some, the rectangular channel space was extended to fit the shape of the foot better and for the larger pieces, new spaces had to be made.

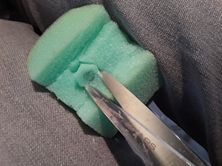
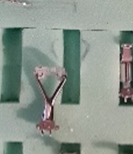
The next two pictures show marking and altering the foam for the awkward shaped feet that extend beyond a rectangular channel. The first picture shows a foot next to its space. This is the same one shown above in a closeup photo.

While in its space, the sides where it flares out beyond the space was traced with the pen. The second picture reshaping the space by cutting out the marked areas.

The larger attachments never had their own spaces; they just got shoved in the blank spot in the back of the drawer. So, spaces were carved and snipped out for them. First, the large parts in the back were neatly arranged where they probably would get spaces marked and cut to fit them. You can see I changed my mind and rearranged a tiny bit. Then, the pieces were traced using a ballpoint pen. And, finally, a combination of craft knife and scissors were used to hollow out the spaces. The cut out spaces are not pretty, but functional.

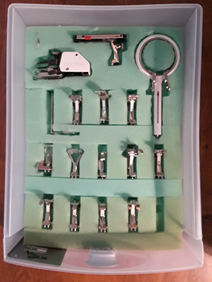
The feet look like they are upside down in the drawers and they are, for a reason. I find it easier to identify which foot I want to select by seeing the tops rather than the soles of the feet. And, the order they are in is just personal preference based on frequency of ones I am most likely to use being placed towards the front.

Thank you LaDonna for inspiring me to share about how I made the presser feet organizer and to finish what I started.

Temari #116 & #117 – therapeutic gifts

The next two temari, #116 & #117, were both made for and given as gifts.

The first one, temari #116- lunes and stars, was given to a physical therapy student who was working with my physical therapist.

temari 116 view 1


It is a simple division temari, meaning it is a sphere with two opposing poles, like the earth having a north pole and a south pole. The division is a hosohedron with “a tessellation of lunes on a spherical surface, such that each lune shares the same two polar opposite vertices.” The lunes are like the wedges in an orange, the shapes on the peel are like elongated ovals with points that meet at the poles.

The picture below shows a different temari in progress which illustrates the division of the sphere surface into lunes as described above.

Dee ball showing lunes

You can also see the lune shape in the center of temari #116 in the picture below.

temari 116 view 2

The next picture shows the temari in progress. Look at all the lune shapes surrounding the temari on the hospital gown.

temari 116 view 3

This temari came with me to several doctors’ appointments to pleasantly pass waiting time. At this appointment, I was working on stitching the four lune shapes that lay diagonally along the equator. I started working on stitching purple as around the lunes shapes, but realized that I did not like the effect, which darkened the whole design.  So, I changed the color to a peach and outlined the lunes and the two polar star shapes with the peach thread.

The next temari, # 117- Leah’s temari, seen below, was given to my wonderful physical therapist, Leah.

temari 117 view 2

temari 117 view 1

Below is a series of pictures showing temari 117 in progress. This is a C8 division temari. It is very similar to temari 107.

temari 117 in progress

The next post will be a tip explaining what to do when switching back and forth between one thread and another when stitching a temari and you don’t want to finish off a thread but don’t want a dangling thread to get in the way of stitching another thread.

Although these temari were gifts for physical therapists, working on them is a sort of therapy too. For me, there is something calm and meditative about stitching temari.

Well, mostly. Once in a while they can supply moments of frustration when a something is not working the way it should. Like when the purple in #116 just didn’t do the job of finishing the design, so it required waiting until I returned home to find the color that worked as an outline for the lunes and the stars.

Did you know that the word lune comes from luna, which is latin for moon? So the name for temari #116 means moons and stars.


Temari #115- learning

Temari #115- the making of this temari was an exploration of incorporating felt into a temari design. The smaller felt circles are hand dyed wool/rayon felt and the larger circles are repurposed felted wool fabric. On the circles, the blue thread is a perle cotton, and the white is a silk/bamboo yarn with the plies split and the variegated thread is the same silk/bamboo yarn with the plies split that has been hand dyed. The background embroidery thread is a hand dyed perle cotton.

temari 115 penny rug view 1

The design was inspired by penny rugs, which are rugs made of scrap wool felt or felted wool fabric, cut into circles by tracing coins and then joining the felt circles to make a rug.

temari 115 penny rug detail 1

Felt appliqued to a temari ball makes for a nontraditional temari, so there was nothing on internet for me to find to guide me on the subject. So, exploration means teaching myself.  Although this is not the first felt appliqued on temari that I have made, I still had some learning to do about appliqueing felt on a temari.

After stitching beads to a couple of the circles, I found out the hard way that beading should be saved for last if possible: after the circles were appliqued to the ball and after the background was stitched. Thread kept getting hung up on the protruding beads. Very annoying and time consuming to have to untangle with almost every stitch.

So, all those lovely beads (except on a couple circles) were stitched last. Stitching beads on a ball is challenging since there is no back to work from like when stitching beads on fabric. Ideally, I would have used a curved needle to make stitching easier, but I do not have one small enough to work with seed beads. Definitely something I will be seeking for future beaded temari projects.

Another lesson I had learned was that felted fabric, if not densely felted, would tend to ravel along the edges. Hence the necessity for an edge stitching.

Something I had to learned before, but had to relearn, was that felt has a lovely pliable quality in that it can be shaped and deformed to take the shape of a non-flat surface. So the circles appliqued to the ball lay “flat” against the curved surface of the ball with no rippling of the edges. But this malleable felt characteristic can be problematic in that the circles can become deformed enough to make them not regular circles, which in turn means the spacing between them becomes irregular even if they are properly placed on the ball.

I struggled with getting the placement of the circles right for quite a while before realizing that it was the circles not their placement since the ball was accurately marked and the circles were centered on the intersections.

The ball was set aside for quite a few months. And ignored. Finally, I could no longer tolerate seeing it unfinished.

This time I could see the problem; I was trying to make something irregular become regular. Eventually, I found that by using the guidelines as a starting point I could adjust the placement of the circles so that the narrow spacing between them was somewhat uniform. This left the pentagons in the background irregularly shaped, but something I could live with. The one in the picture below is one of the more regular shaped ones.

temari 115 penny rug detail 4

All the circles got stitched down. Then it was time to stitch something in the blank pentagon spaces. I tried a couple designs that echoed the pentagon shape. Not a good idea unless I want to emphasize how deformed the pentagons looked. So, I guess I had not really learned my lesson yet about how to deal with the irregular spacing.

temari 115 penny rug detail 3

Finally, it dawned on me. An irregular pattern in an irregular space. Embrace the irregular.  A random fill pattern based on Chinese ice ray lattice patterns was stitched in the blank pentagon spaces. Okay, I admit that the background stitching is just a distraction and the irregularity of the pentagons are still there; but it is a good distraction and a nice background pattern too.

temari 115 penny rug view 2

More about the temari:

Temari #115 is a C10 division. The smaller felt circles are hand dyed wool/rayon felt and the larger circles are repurposed felted wool fabric. On the circles, the blue thread is a perle cotton, and the white is a silk/bamboo yarn with the plies split and the other thread is a hand dyed silk/bamboo yarn with the plies split. The background embroidery thread is a hand dyed perle cotton.

Temari #111-113: on dynamic design

Each of these three temari designs have a dynamic element to their design.

Sometimes a creative block occurs for a particular project and it gets put on hold for a while. Temari #111 is such a project. It was on hold so long that I forgot I had it until I came upon it while sorting and reorganizing sewing supplies.

Only the purple triangles were stitched at the time it was abandoned. They looked like floating picture frames with no purpose. Not very interesting or dynamic.

In the picture above, you can see there are two needles at rest, stuck in the ball while I take the picture. There are two needles because the squares are stitched in alternate light blue and dark blue rounds.

So, I added the square picture frames as connectors to tie the triangles together and to emphasize the spin of the design. I had started thinking of them as picture frames because they looked empty as if they needed to display something to give them meaning.

Both the square and triangle picture frames were filled.

Temari #111 is a C8 division. Think of cube or tetrahedron polyhedrons. The squares are on the faces of a cube or the points of a tetrahedron. The triangles are on the faces of a tetrahedron or the points of a cube.

The 6 blue squares are on the poles. The orange trefoils (I forget the Japanese temari term) are on the center of the triangles with their points at the center of each side of the triangle markings. You can see the black thread marking the ball as I forgot to remove it. The purple triangles are also centered on the marked triangles, but turned so that their points are about halfway between side and point of marked triangle.

Temari #111 is dynamic in that it has bold design elements and a design that creates a strong illusion of motion.

Although temari #112 is a relatively simple design of only two elements, the division is a C10 which is a bit more difficult and time consuming than a C8.

 A C10 is based on the the polyhderon the dodecahedron with its 12 pentagon faces.

Originally, I had planned for the triangles to have multiple rows of stitches, but it became too dominating, so unstitched what little I had done and scaled back to one row.

Without color, Temari #112 would be a very static design. To prevent the allover pattern from becoming completely static, a variegated thread was used for the triangles. The underlying triangles help move the eye from one pentagon flower to another with the use of changing color relationships.

Temari #113 is another C8. It was marked for a C8 with thread matching the ball wrap, then additional division lines were added in light blue to define the faces of a Great rhombicuboctahedron (also known as truncated cuboctahedron), which has octagon, hexagon and square faces.

Double thread lines were wrapped with another thread to create a thicker thread line to define the shapes. The octagon design was stitched first since they were to be the focal points of the temari design. Something seemed to be missing until the little french knots were added to the points of the single thread design element.

Lately, the lattice design that is referred to as asanoha (translating to hemp leaf) in Japanese design, has been showing up in my temari. It is a lovely triaxial embroidery pattern that makes a wonderful filler. I could not resist using it in the hexagon spaces on this temari.

The little squares needed a fill that would visually connect the octagons and hexagons without demanding much attention, adding to the overall design without detracting from the other two elements.

Here again, variegated thread does help break up the otherwise static design. Although the lattice design in the hexagons use almost solid colors, changing scale of design detail helps prevent the overall design from appearing flat.

The threads for all three temari are some of my hand dyed threads.

Dynamic design is something I work towards in most of my artwork. Here, design element placement was used in temari #111 to create an illusion of movement of shapes.  In temari #112 and #113, change in scale played a small role in contributing to a dynamic design by preventing the surface from appearing flat. I know, not possible on a curved surface, but the concept if on a 2D surface would be better illustrated. Also, in temari #112 and #113, variegated color threads were used to create changing relationships between design elements, causing the eye to explore the surface. 

I hope you enjoyed an inside view of some of the thought processes that goes on when I design temari as much as I enjoyed making them.


Temari 107 to 110: being patient

Being Patient. For me, temari #107 to 108 represented the state of being patient.

For these temari, I was patient by both commonly used definitions: “Able to accept or tolerate delays, problems, or suffering without becoming annoyed or anxious.” and “A person receiving or registered to receive medical treatment.” Not surprisingly, the origin of the word patient means suffering.

Temari #107 was begun in May, before a series of surgeries. It went with me to quite a few doctors’ appointments. This is a C8 temari stitched with hand dyed #8 perle cotton threads and a silk/bamboo yarn.

I am very pleased by the effect of contrasting the light/heavy threads and delicate/bold design elements.

You can see part of my temari project bag to the right of the picture. This is a newer style of my temari tote bags. Maybe this will be the subject of a future post. My original style of temari tote bag had a hexagon base and a drawstring closure which went through a several revisions.

When I finished this temari at one of my appointments, I was so excited that I took a picture and texted it to a friend. I never did rephotograph it with a better background, hence the hospital gown as the background.

Then, I started another temari so that I would have something to work on while recovering from surgery. I was excited about the diamond design and looking forward to finishing it.

Then there was a long gap of a couple months before another temari was finished.

During a period of a month, I had four surgeries and an emergency room visit with hospital stay. During that time and for weeks afterwards, I did not feel like sewing, nor much of anything else, not even even read a book nor listen to music. Pain, lack of energy and just not feeling well were not good motivators for even favorite activities. The not feeling well was in part due to a mystery infection that prompted an emergency room visit and subsequent several day hospital stay between a couple of the surgeries.

But, in the thick of it all, I did find a couple days where I was inspired to and had enough energy to make a small temari. The diamond temari had to wait for a while longer.

Temari # 108 is a mini. It is a C10 temari with a diameter of about an inch or a little less. The design is the same as temari #100, but in a different color scheme. The threads are: perle cotton #10, three strand embroidery floss, two strand embroidery floss and single strand embroidery floss. Only the perle cotton threads are hand dyed.

It was made under a magnifying glass and made for one of my surgeons. He is a microsurgeon who uses a microscope to perform surgery. My work was not nearly as complicated nor as challenging as his was, but the gift was well received.

I think my next mini temari challenge will be to work in finer thread to achieve greater detail.

After quite a few weeks of waiting, mostly sleeping and trying to be patient and not get frustrated by a lack of energy to do anything, I finally picked up the diamond temari and started stitching again.

The diamond temari, # 110, was actually finished before #109, but I forgot to photograph it and number it before its predecessor. My temari are numbered by order of finishing, otherwise it would get confusing since I often have several in progress at the same time.

Unlike the previous temari design, this one was completely unplanned from the beginning.

The threads are all hand dyed perle cotton. When I first started this diamond, my vision of the design did not go beyond the larger diamonds. Next the smaller diamonds were stitched. At this point, the design was missing a critical element to visually tie the diamonds together, which turned out to be the hexagons. Lastly, little diamond were stitched since the hexagons needed a connecting element and something to finish the diamond spaces. 

With the diamond temari done, another temari project was needed to keep me occupied at upcoming doctor’s appointments. Thinking to make a simple design, I embarked on a C8 temari with large and small squares that woven together with triangles. I thought I had come up with an easy design that would not require much concentration, but nope. I kept messing up the under/over start of a band and would have to rip it out and start over. Doctor’s offices can be rather distracting. It could have been a real trial of patience but I never did get frustrated.

Temari #109 is a C8 stitched with hand dyed perle cotton threads.

Before and between surgeries there were a few sewing projects on the sewing machine that demanded my attention. These were projects that I felt could not be ignored, things that made my life a little easier or less painful such as making a comfortable surgical drain holder, a seat belt pillow and altering post-surgical garments.

I used to wish I was a more patient person. I know better now. For me, developing patience means trials that will challenge me to develop patience. That type of challenge is often not very pleasant. Overall, I have been a patient patient, and since I must go on being a patient with many more doctor’s appointments to go, I might as well continue to practice patience about being one. 

With the distractions of health issues, it would be easy for that to become the focus of my life, rather than a distracting part of it. Admittedly a very distracting and disruptive part of my life. Most of the time, I remain patient with where I am at in my recovery and work towards being able to fully return to my normal activities that are central to who I am.

Fortunately, temari making is a good activity for me to indulge in while waiting until I am able to do more physically demanding activities.

Currently, I have another temari almost done, and plans for many more. And then there are other non-temari sewing projects too, which I will write about another time.


Temari #105- frost

Temari #105 is finally done after 4 weeks in the making.  It started with couching silver cording to the ball. This temarii does not have any geometric division of the surface, The embroidery is free form.temari-105-detail-in-progress

So that the couching thread would be less noticeable, a fine silver thread was used. Because the thread is not smooth like an embroidery or perle cotton thread, the thread would snag on threads in the ball when stitching. This would lead to the thread shredding and breaking. Very annoying. But the effect was worth the extra effort.

Each spiral is crested with a ridge of silver and turquoise beads, like the hoar frost.
temari-105-detail-in-progress-2  The leaves were frosted too.temari-105-finished-3


And then sequins and beads were added to the background, creating the glitter of sunshine being refracted from all the frost in the area surrounding the leaves and tendrils.temari-105-finished-4


This was a difficult temari to photograph. The ball looked dull with indirect lighting, or there was glare with direct lighting reflecting off of the beads. The glare is much like sun on the snow in our yard now.snow

Do you see the glitter of sun on the snow in the picture above?the-gate-in-snow

The picture above was taken yesterday.

temari-105-finished

snow-on-patio

By this morning, there was about 6″ accumulation.


Temari #106: a snowman temari with a mini snowball temari

temari-106-snowman-with-mini


Temari #106 was inspired by the current season. We have not had a snow yet this winter in our area, but there is still plenty of time in the season for snow.

This temari is really four balls wrapped in white thread, of which only one is stitched as a traditional temari. Three are stitched together to make a snowman. The fourth separate ball is a miniature traditional temari.

Making the snowman and his snowball presented interesting challenges and learning experiences.

four-ball-temari-in-progress

In the previous post, a hint of a snowman to be was given in the picture above. If I had shown them arranged as in the picture below, it would have been obvious what was to become of the three balls.temari-106-in-progress

.

As you can see in the horizontal picture above, the third ball is an unwrapped polystyrene ball. The core of all three are open cell polystyrene balls. Normally, I do not use foam balls for the core of my temari, but this is one of the few exceptions.

The reasons for using polystyrene balls is that they are deformable. I wanted to balls to be slightly flattened so they would “fit” together and so the base of the bottom ball would be flat enough for the snowman to stand without any support.

temari-106-in-progress-3

As for the the use of open cell versus closed cell, the open cell is easier to deform and keep its shape and with the rough surface, the layer of batting and thread sticks nicely to the ball rather than sliding off a smooth surface.

To give a little more stitching room between the foam and the thread, a single layer of polyester batting was wrapped around the sides of the deformed balls. Only on the sides of the middle and bottom balls, as I did not want the batting to round out the flat surfaces.

temari-106-in-progress-2

The third ball for the head was a bit too tiny, so the whole thing got two layers of batting.

The fourth ball does not have a foam core. There is a tiny bell in the center.

Using plastic canvas, an X shape was cut out and the bell tied to the center of the X.

temari-106-in-progress-4

Opposite ends were brought together and sewn, creating a cage for the bell.

temari-106-in-progress-5jpg

A little thread was wrapped around the cage to prevent the layer of batting from getting inside the cage and dampening the sound of the bell.

temari-106-in-progress-7jpg

Finally, more thread was wrapped around the tiny ball to give it a finished layer for stitching into.

The final wrapping also helps to round out the rather lumpy ball. It is still a bit lumpy in the picture below as the wrapping is not quite finished.

temari-106-in-progress-6

The mini snowball temari was marked and stitched as a C8 division. The marking and the snowflakes were stitched using single strand silver embroidery floss. The metallic floss was an incredible challenge to work with. It likes to shred as it is not smooth and does not like to lay flat either since it is not smooth. So the little snowflakes have a bit more character than was intended, making each one more unique.

Working with the metallic thread was rough. So was trying to stick pins in the ball to mark it. The pins kept falling out as I could not stick them in very far due to the bell cage and size of ball. Eventually, I gave up on the pins and just marked it by eye.

temari-106-mini-without-its-snowman

When it came time for assembly and embroidery, I got so wrapped up in the project, I forgot to take more in-progress pictures.

The temari snowman needed some”stick” arms that are posable so he can hold his mini snowball temari. Separate stick arms made of thread wrapped wire bent into arms with three fingers. The thread was white,  a little bit of brown acrylic craft paint transformed them to stick color. To stick arms into the ball, a large needle was used to ream a hole into the ball from the shoulder all the way through towards the waist for each arm and excess wire shoved back into the ball.

The little felt hat and scarf set started off being a crocheted set. My patience for crocheting and the fact that the hat just did not look right, made me switch to felt.

The first felt scarf was a single piece of felt. It was stiff and looked stiff. So, I cut it into three narrow strips to braid. Nice idea, but not long enough. I was working from a small leftover scrap of felt, so I had to cut three more pieces and stitch them to the other three to have three longer ones, ones long enough to braid. And the connection had to be done carefully so as to not be visible. That made a softer scarf and one with more character, especially after adding bells to go with the one on the tip of the hat.

temari-106-in-progress-8

For some reason, the cute grin in the front view ends up looking slightly mischievous in this side view, almost as if he is contemplating throwing the snowball at someone.


Continuing, Finishing and Starting: three concurrent projects

In the previous post, a preview of  a winter themed temari showed the start of the temari in the picture below. The couching is finished and now I am continuing with beading. It is slow going, so it will be a while before a picture of the finished temari is posted.

temari-105-detail-in-progress-2

Stitching and things fiber are not my only skills or medium I work in. Occasionally, a drawing gets produced. It has been too long, so I had forgotten how much I enjoy working with graphite pencils and drawing. Now, with a new pad of paper I received as a Christmas gift today, there might just be more drawing in my near future.

Our wonderful dog was the subject of the drawing below and a gift for my husband. With being unable to do much with my dominant hand for over a month, my plans on getting this drawing and several other projects finished well before Christmas was impossible. So, the drawing got top priority when my hand was ready to draw, finishing it just in time. The other projects will just have to wait on my to-do list.

drawing-of-our-dog

Although I have not finished the turquoise winter temari, I have started another one. Yes, one even though the picture below shows three balls. In fact, a fourth ball and smallest one is missing from the picture. No, I will not tell you what it will be until it is done. And work in progress pictures would probably give away what it is supposed to be. Anyway, it is coming along quickly enough that it should be posted soon.

four-ball-temari-in-progress

Can you guess what the four temari balls will be?

Temari #104- colors of autumn

The colors of autumn inspired the color theme of this temari, which is #104.

We have two Japanese red maple trees in our yard that are a joy to watch their colors change with the changes of the seasons. One stays red from spring to autumn, just changing to a deep, dark red and the other is a bit more dramatic in its color changes. The second tree starts red in spring. Next, the the leaf canopy of the taller oaks and hickory trees fills out and shades the little red maple tree. Then, the red maple tree turns green until autumn when the leaves turn a lovely deep red to burgundy, like in temari #104.

temari-104

I just finished this temari. It has been over a month since I started to stitch the pattern. It would not have taken so long except I had to take a break from stitching and other fun stuff that required the use of my dominant hand.

Compression of nerves and tendons at the wrist caused much irritation of nerves and tendons, requiring a brace and resting the arm. The arm is almost well. The tendons are still a bit tight, so range of motion still has not recovered yet, but it is slowly improving with gentle stretching exercises.

What was begun in autumn was finished in winter. The trees are bare now and we have had subfreezing temperatures at night and frost. So it looks and feels like winter too.

My next temari, the one I am currently working on, is winter inspired. The colors are turquoise and silver.

I keep a basket of what I call temari blanks. They are temari balls that have been wrapped and are ready for stitching. I don’t measure and mark a blank ball until I have a general idea of what kind of design I am planning on stitching. So, they really are blanks.

This temari is a rare departure from my typical temari designs which are usually based on geometric division of the ball surface. The design is being freehand embroidered, so there was not need for measuring and marking the ball.

A turquoise ball in the basket and some recently purchased silver colored cording are turning into a winter temari. A winter theme was the perfect excuse to try out couching the new cording on a temari.

temari-105-detail-in-progress

Here is a preview of the start. To see how it looks finished, you will need to come back soon.

Temari: #102 & #103

Temari #102 and #103 represent all my temari production for the past couple months.


The one above is #102, a C8 division. If it looks suspiciously familiar, it is because it is a C8 version of my temari #101, which is a C10.

There are less Shasta daisies on this one, but the flowers are a bit fuller appearing since there are more petals per flower.

The perle cotton threads on this ball are ones I hand dyed.

The next temari, #103, is a C10 division. There are six bands that make up the wider nine thread bands. The sixth band is a zigzag that circumscribes the ball instead of a straight line.

The remaining negative spaces were highlighted with narrow three thread bands.

A pastel variegated thread alternates with black in the wide bands. Although this might no show well on the computer screen, in person, this creates a subtle dynamic quality to the design.

Only the pale peach thread used in the diamonds and to tack down intersections is one of my hand dyed threads.

Only two temari to show for over two months is very low production for  me. With a number of health issues that are as tangled as a ball of thread after a cat has played with it, I am pleased to have achieved this much.

There is another temari in the works that is going with me to doctors appointments. Lately, the wait times have been relatively short, so not much progress at appointments.

A new C10 temari, maroon background with twelve stars, is going with me today to an appointment. What will go in the hexagon negative spaces between the stars is yet to be decided. Postponing that decision gives me something to look forward to.