In this post, I offer some solutions to some of my sewing room problems that I have encountered over the years. Frustrations with problems of sewing room storage and use lead me to solutions to make the space more user friendly. I often wished that I had found solutions a long time ago, but realize that as my needs change, so will my solutions. Maybe some of these ideas will be of help to you.
My first sewing room addition was my sewing table. It is actually a desk purchased at a used office furniture store. The sales person was surprised that I was passing up the nicer looking executive wooden desks for one with a plastic laminate surface and that I intended to cut a hole in the top. It was the perfect solution for my sewing machine. It provided a large, smooth surface for larger sewing projects such as quilts. It was far less expensive than a sewing table. I cut a hole for the machine and added a shelf to support the machine (which also created an additional shelf for storing a small ironing pad and small cutting rotary mat).

Re-purposed used office desk as my sewing machine table
Later I drilled a hole in the table top to add a swing arm lamp for better lighting. Then I mounted the electrical power strip to the side of the table so I would not have to crawl under the table to find it. It seemed to always migrate to the back. Some days I just don’t feel like crawling under the table.

Power strip mounted for easy reaching
Besides, that is where I store boxes containing current projects. If I have several projects going at once at different stages, then I never have to worry about getting burnt out on a project, because I can always switch to another.
Also tucked under the sewing table when not in use is my chair. It is a backless office chair that I purchased at a county surplus sale for $2 then recovered it with a quilted piece of scrap lightweight canvas. I never lean back when sewing, so there is no reason for a back that would get in the way in a small room. The floor mat makes it easy to glide back and forth between the sewing machine and the tool cabinet or the small bookcase.

Reupholstered backless office chair
The table has a generous space to the right of the sewing machine which allows for all sorts of in-progress supplies (and junk) can pile up. But there is also space for a CD/radio player which I consider essential to sewing.
The next addition was a tool cabinet. This had been a gift from my parent in-laws for us to store tools in, tools such as drills and wrenches. It was a better fit for the sewing room tools and a six foot tall cabinet in the utility room was a better choice for the other tools. Also, the shallow drawers are perfect for things like template plastic and small tools, while the deeper drawers work well for larger tools and supplies.
After buying a couple of rotary cutting rulers, I had to find a way to store them for easy access. The best solution I could come up with was a multi-pocket organizer like the kind used for shoe storage, but custom fit to rulers and triangles. It is held in place on the side of the tool cabinet with to magnetic hooks at the top. Unfortunately, it has become so loaded that it is sagging. It might be time to cull out the ones that never get used to lighten the load. That would be easier than redesigning the organizer.

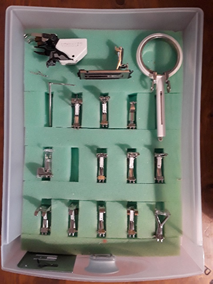
Tool Cabinet
The top of the tool cabinet is the parking spot for my dry iron. After having used various irons over many years of sewing, this one is my favorite. In case you were wondering how the iron is a solution to a problem, I will tell you it was several problems solved. The sole plate is solid stainless steel. That means even heat distribution when pressing which is important when using fusibles. Having little spots where the fusible did not heat set due to little steam vent holes are annoying. Also, I never use the steam feature as I prefer to use a spray bottle to dampen my fabric that way no blobs of black gunk coming out of steam holes to ruin my fabric. The stainless steel bottom is easy to clean, if necessary. There is no auto-off feature on the iron. This is an advantage if you are trying to move the iron slowly, such as when making binding, because the iron does not shut off every few seconds. The disadvantage is that I have to treat it like a stove- if I walk away, I turn it off or unplug it. This one was purchased through mail order from Vermont Country Store on the recommendation of my friend Carol.

Iron with stainless steel sole plate and no steam holes and no auto-off
Our dining room table was oversized for our family needs and just the right size for my sewing needs, so it migrated from the dining room to the sewing room. It is probably better protected from damage in its current location and use than it was before being reallocated to support creative production rather than culinary consumption. The table is covered with its original heat proof pads, which are secured in place with a canvas cover, over which is placed a large rotary cutting mat on one side and an ironing pad on the other side.

Dining room table reallocated as sewing room work table
The ironing pad was made for use on this table. It is felt and ironing board fabric edge-stitched together. If this were a different table, the pad would need a thicker layer of felt to protect the table from heat, but the table is already covered with heat-proof pads. This was far less expensive to make that the original ironing pad that I purchased, which unfortunately had an inaccurate grid and was too spongy as I usually prefer a firmer ironing surface.
The problem with most tables is the height is appropriate for sitting at, not standing to work at. Standing at a table that is too low when doing activities such as rotary cutting and basting a quilt, is hard on the back after a while, even for someone like me who is on the shorter side of average height. That problem was easily solved with bed lifts.

Bed lifts for the work table
An added benefit of jacking up the table is additional space under the table to store boxes of fabric two high. Not being a typical quilter who adds to a stash with purchases of fabric that might one day be used, my boxes of fabric are just leftovers from various sewing projects, not just quilts, so the space under the table is adequate.
When my son’s books outgrew a small bookcase, it was re-purposed in the sewing room for storing the thread stash. Thread is one material I confess to stashing, probably for some of the same reasons most quilters add to their fabric stash. The clear plastic thread boxes stack neatly on the shelves making it easy to organize and find the right thread for a project. There was enough space for other supplies too.

Small bookcase filled with clear storage boxes used to organize thread and other small supplies.
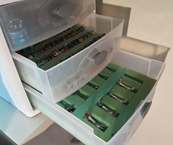
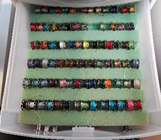
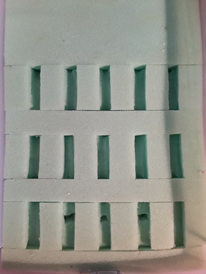
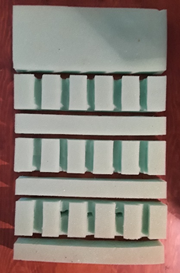
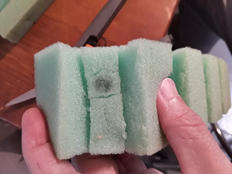
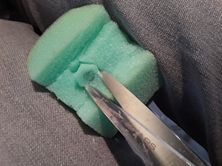
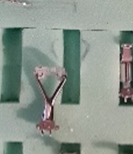
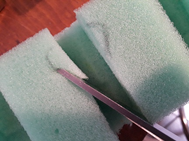
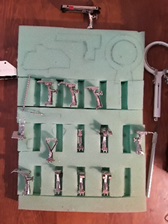
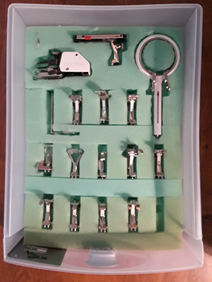
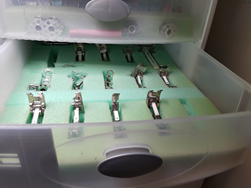
Finding a storage solution for thread bobbins and sewing machine presser feet took years of enduring scrambled bobbins and presser feet. Bobbin boxes were too small and did not keep the threads from tangling. The original box for the presser feet was quickly outgrown so new feet were just piled on top. The proverbial light bulb came on one day, and the idea to use foam with channels cut in them to organize them came to me out of the blue. The foam is cut to fit drawers in a little plastic three drawer organizer. No more messy bobbins or misplaced presser feet. This idea worked so well that I will be trying it to for storing other tools such as compasses.

Custom fit bobbins and feet drawers made using foam inserts
Tucked in the corner between the tool cabinet and the bookcase are some awkward to store items such as a box of patterns and a homemade light box. The light box was easy to make and a great solution to a dependable and horizontal surface for tracing patterns onto fabric. Taping pattern and fabric to a window was a method that was not working as it depended on daylight and was not a comfortable work surface. An internet search for how to make a portable light table will yield many results. If you use the term “box” instead of “table”, you will get a box for photo shooting instead.

Awkward bulky stuff stored in corner
There was a skinny space between the sewing table and the door that was a perfect size for a narrow bookcase found at a consignment shop, to store sewing books, notebooks, drawing paper and other things. The space on top is not wasted as it is storage space for more supplies.

Tall bookcase fills an otherwise wasted space
My dogs like to keep me company in the sewing room so they need beds for napping. Not really beds as they prefer a makeshift bed of a box or basket half filled with fabric, and if that is not available, than any scrap of fabric will do. My son often keeps me company too as he enjoys listening to music or an audio book with me as he works on his studies and sprawls on the floor as he is now way too big for sitting on the sewing table which used to favor when he was little. And on the rare occasion that my husband is brave enough to visit my normally messy sewing room, there is a chair in the corner.

My sweet girls think all fabric is for them to sleep on
I tidied up the room for pictures, but finding solutions to sewing room problems with organization makes even a messy sewing room user friendly. I hope you found some good ideas here for solutions to any sewing room problems you might have. I’ll bet someone can find the stray spool of thread that escaped my clean-up. The first person from whom I receive a reply to this post who has correctly identified where the spool is in one of the pictures in this post will get a prize (if you are in continental USA)- a handmade, quilted fabric box.