Why Big:
Always looking to explore new challenges, I decided to make a large temari- a very large temari.
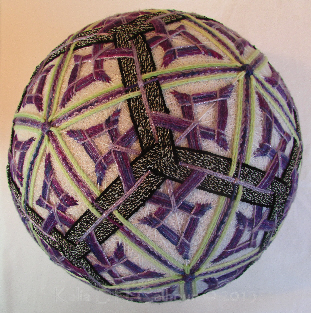
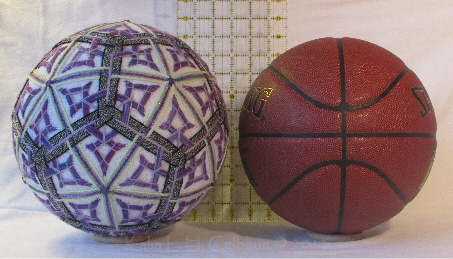
Most temari average 3″ to 4″ in diameter and larger ones that I have seen on internet are about 6″ to 7″ in diameter. The largest one that I had made was slightly larger than a basket ball at a little over 10″ in diameter. That size did not really present much in the way of technical or design challenges, so I decided to go even larger. Temari #26 (aka Knot Temari or Big Temari) is 21″ in diameter. That is about the size of a typical large beach ball.
Challenges with Big:
The biggest challenges in making a very large temari had to do with handling a beach ball sized ball. If the core was made with my usual materials such as scraps of fleece or batting wadded around a noise maker, as lightweight as those materials are, they would have made the ball too heavy to handle.
Wrapping the ball in yarn and thread was another challenge that required a new method for coping with size.
I decided to use a thicker thread that would be more proportionately pleasing on the large ball size and type of stitched designs that were going to cover the surface. Trying to find the right size thread was a challenge that was met by not finding it, but making it.
Thicker thread required a larger eyed needle. Stitching on a surface of a sphere for which the curve is closer to flat than on a small ball meant that short straight needles were not going to be as effective as a long curved needle. So, a large eyed, long curved needle was needed, but where could I find one?
creating designs suitable for a large scale ball, rather than an enlarged version of something appropriate for an average sized temari, was a challenge that provided an opportunity to explore more complex designs.
In the following section on how the temari was made, I explain how all these challenges were tackled.

How made Big:
One of the most important things I had to consider before starting was determining what to materials to use for the core. It needed to be light weight so that as a large ball it could be reasonable to handle without causing fatigue. It also needed to be malleable that could be shaped into a sphere while being firm enough to retain its spherical form. I did not want to use a material that would degrade. And finally, cost and environmental impact were concerns.
Polystyrene packing peanuts fit all these requirements. Polystyrene is an inert material which does not break down, attract moths or other bugs, and is very lightweight. As a bonus, it was free since it was donated by a friend and their use defers their destination to a landfill.
Using polystyrene packing peanuts meant a means of containing them had to be found. On internet, I noticed that temari makers who use loose fillings such as rice hulls, will fill the toe of a sock or stocking or wrap paper or plastic around the loose fill. I used two mesh laundry bags to hold the peanuts.
Making the core of this temari started with partially filling two mesh laundry bags with polystyrene peanuts. One bag was not big enough, so I used two. They were not completely filled as a rectangular pillow shape would have been difficult to reshape into sphere. A bell was added to each bag. (A friend’s mother who is Japanese and used to make them when she was younger is disappointed when a temari is silent, so out of respect to her, I add a bell to each temari I make.)
Then just enough yarn was wrapped around the two bags of foam peanuts to make it roughly spherical in shape. Next, strips of batting were wound around the rough ball to smooth out the big lumps and provide a smoother surface for the yarn wrap. Three pounds of yarn was used for the next layer. For the final thread layer that would be stitched on, four cones of black serger thread (3000 yards each) were used.
 At first, I used a chair to rest the core on while winding yarn. The height of the chair seat height was good for thumping the ball down to compact the foam peanuts while shaping it into a tight ball so they would not shift around and deform the shape later.
Once the ball was stable with no foam peanuts moving around, I found that winding the yarn was easier when I had the ball resting on a smooth table. My sewing machine table is a desk with plastic laminate at a good height to work at while standing. After some trial and error, I found a method of spinning the ball with one hand while guiding the yarn or thread with the other hand. Winding the yarn and thread on the core took a long time since I found it necessary to work in small time chunks each day to prevent repetitive motion injury.

When I was done wrapping the ball in its final layer of black thread, I discovered that the solid black on that scale was not very pleasing as it gave the surface a dead flatness (for lack of better description) that was contrary to its physical shape. So, I added touches of color that would be used to embroider the surface later. Machine embroidery threads in purple, turquoise and dark pink were sparsely wrapped over surface of the black and then a sparse layer of black over the colors to visually integrate them with the black surface. The solid black on such a large surface made the ball remind me of a black hole, giving the whole thing a heavy appearance, so adding the colors near the surface tied the surface of the background into the stitched designs.
When I started this temari, I was unable to find a large eyed, long curved needle to purchase locally, so I made a couple. Later I found some which I bought. For larger curved needles, I prefer the shallower curve of the ones I made over the purchased ones.

Small purchased needle and two large handmade needles
The surface of the ball was divided as a C10 in the usual way with a strip of paper. Actually tyvec was used here since I had a piece long enough. I don’t intend to use that again since it was a little stretchy therefore hard to keep marking accurate. The finished marking was close enough to true that it would not affect the stitched designs, so I left the marking.

Then the purple bands were marked and stitched based on the icosidodecahedron polyhedron, which is the tessellation of twelve pentagons and 20 triangles on the surface, for 32 faces. To do this, the bands went through the middle of adjacent sides of pentagons which creates a smaller pentagon on point inside each pentagon and the lobbed off corners of the larger pentagons become the triangles.

I am very fond of variegated yarns and threads since they add a dynamic quality to what would otherwise be a static design, but I usually use them with a solid to show off their changing nature. I found the perfect colors, but not in the right size. The yarn for the purple in the bands was an eight ply cotton yarn which I split into 4 plies. The yarn used for the knot designs were 4 ply cotton crochet threads all of which I split into 2 plies. Splitting the yarns brought all of them down to about the size of #5 perle (pearl) cotton.
Each of the pentagon areas were embroidered with knot designs. For the triangle, I used the same pattern and colors for all 20 to have a constant throughout the ball. For the 12 pentagons, I created 6 knot designs to use as pairs on opposite poles so that no two alike are seen at the same time.

At first, the ball was just placed on a round lipped waste basket (don’t worry- it was new and clean) while stitching the knots, but this required frequent lifting and turning of the ball. I found this to be really tiring and hard on the arms and shoulders. So I mounted the waste basket on a lazy susan (turntable with ball bearings) which I mounted on a piece of plywood (to stabilize the base). This was placed on the floor in front of my chair. The turntable significantly reduced the amount of turning necessary to stitch the designs, but it still had to be lifted occasionally.


Having Fun:
I have to fight a tendency to preplan projects down to the last detail in my head or on paper, leaving no room for spontaneity or happy accidents and once it is done in my head, then I get bored with the project long before it is completed. Consequently, I try to save some things for designing as I go.
Although I designed each knot pattern as I went, I had already determined the thread colors and made up some design rules to help guide the design process. Some of the rules I made up were things like: the number of threads wide for the bands of each color, each color occupied the center of two knot designs, the green thread was the main color and the other two played supporting roles, the main color must create a knot without the aid of the intertwining of the other colors. Then I deliberately bent or broke the rules to add interest created by inconsistency.
This was a fun and challenging project for which I found the entire process and end product to be very rewarding. I am certain there are more temari in the large to very large categories in my future as there is something about the scale that is just appealing to me.


